Wednesday, January 4, 2012

Repurposed Window + Hanging Pictures


This window frame project actually happened after I accidentally broke the glass when we were moving last year.  It was originally hanging up in our first home with a couple of other windows on either side of it.  


I had seen a similar hanging picture display in the Pottery Barn catalog, but it was a bit out of my price range.  After staring at my broken window for a couple days I thought I could fix it up to look like the Pottery Barn display that I admired so much.   


Sidenote:  The windows were used in our wedding and my mom later gave them to me to decorate our home with. (Thanks Mom!)
The one in the back middle is the window that I used to make this project with.  


It was very easy to make- I just screwed in some eye hooks on the inside of the frame and then used twine and clothes pins to hold up the pictures.  To hang the window frame we used eye hooks and wiring on the back.


Check out your local flea markets or antique shops to find these types of window frames.  There are so many fun ways to use old windows so buy a few when you find them! :)


Monday, January 2, 2012

Red Shelf

This may be one of my most favorite little projects!  Greg and I made this red shelf and it is just what our home needed!


 My most favorite part--- the built in mason jar!


The shelf is made out of two 3/4 inch plank wood pieces and held together by the three metal L-brackets. 
 The top is trimmed with a small piece of molding.   
Painted red, lightly sanded, and stained.  


 The shelf is secured to the wall with two frame hooks.


The mason jar hole was cut was a jig saw.  


Mason jar!


Now just add some fun knick-knacks and your shelf is complete!


Saturday, December 31, 2011

Framing Fabric

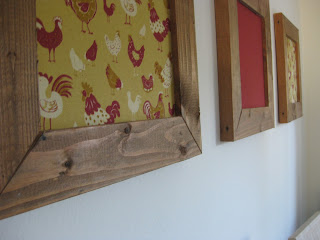
Framing fabric is a good way to add color or a pattern to any wall! Greg and I made these wooden frames for our kitchen and framed some fun fabric to match the other decor.  It was a great way to brighten up our boring, white apartment walls!

First we measured and cut the wood pieces (douglas fir, 2 in by 4 in) to fit the wall of the kitchen and used a router to cut the channels down the inside middle to fit the fabric into.


Lightly stained the pieces (Minwax- Early American).


We simply wrapped the fabric around cardboard then ducked taped it (Greg's favorite part!) to keep it in place.  Then placed the fabric board into the cut channels and screwed the pieces into place.  

So cheap and easy!  Love it!


I also did the same thing with a frame and some burlap fabric.


Small canvas print 


I wrapped the burlap around a piece of form board and secured it into place with pushpins (you can also use a hot glue).


Then used pushpins to hold up the small canvas print.  Again, so cheap and easy! ....Have I mentioned we are newlyweds on a budget :)

VoilĂ ! Happy Crafting!


Friday, December 30, 2011

Little Blue Desk


When Greg and I moved to Ocean Beach last year we needed a little desk to fit in our new little home.  Since we don't have a big budget for home decor, I searched Craigslist and found this cute little white sewing desk selling for $20.  It was the perfect size and after hearing our story (newlyweds, just moved into town) he gave it to us for FREE!  (What a nice man!)

Just the right size!  After Greg took his sander to the sides of the printer it fit right in there! :)


And now the makeover...

After some pretty blue paint (Home Depot- Martha Stewart- Artesian Well), a little home made curtain, and some new Anthropologie knobs (I had a giftcard- thanks mom!)...

Ta-da!  A new desk!


The printer still tucked away, but now hidden by the curtain.


Love these knobs!


I love how the little blue desk turned out!  

It only cost me about $15 to make (giftcards don't count in my brain) and it's perfect for storing our office essentials! 

Wednesday, December 28, 2011

Headboard

Greg and I made this headboard in just a few hours and I love the character adds to the room!  Here is a brief step by step on how it came together.

#1- At Home Depot we bought 11 cedar strips- all 6ft by 7.5in.  As well as some thinner boards for the cross pieces.


#2- Lined up the wood to make sure it was nice and straight!


 #3-  Measured the cross pieces to cut (we did not have to cut the 6ft pieces)


#4- Screwed the cross pieces into the vertical pieces.


#5-  The headboard finished!  

Thanks Husband for your help!  I love how it turned out!  

I think I'll add some more of the projects we have made over the next week :) Stay tuned!

Wednesday, October 5, 2011

?

I would like to start my own business, but I don't have a product or skill to sell...hmmmm.

Suggestions welcomed.

Sunday, May 29, 2011

May Updates.

I apologize Blog World for being such a blogging slacker.  I hope you can forgive me for my lack of posts!    It's been a fun, busy month that I figured would be best shared in a collection of photos.

ENJOY!

May was filled with...


A GARAGE SALE!


We had a garage sale to help raise funds for Becky's two-month summer internship with Children of the Nations in Uganda.  Friends and family donated so much great stuff to sell and in the end we raised $780 dollars!  I think it was a garage sale miracle.

WORK!


Here is where I spend a good amount of time at during the week- my Habitat desk!

ANGELMAN WALK!


The little girl I babysit, Julia, has been diagonsed with a disorder called Angelman Syndrome.  Greg and I got to walk with Team Julia to help raise support and awareness.  It was a blast!

FOOD!


We love food!  That's me and my first home-made apple pie and lasagna.

BEACH!


We had our first bonfire of the 2011 summer season!  Hot dogs, smores, friends...what could be better?!


And my favorite part of May...BABIES!


Ethan Hunt

Brennan Goebel

Greg and I's bestest buddies BOTH had babies in the same week!  We had so much fun meeting our new little friends- Ethan Hunt and Brennan Goebel!